Cedar’s blanket

When I was pregnant with Cedar I moved far far away from my own family and friends (well mostly, i actually moved a little closer to some..)

At times i felt so lonely on my journey. disconnected from established support as i grew this great belly, endured immense ongoing nausea and began to put tender roots into my new community.

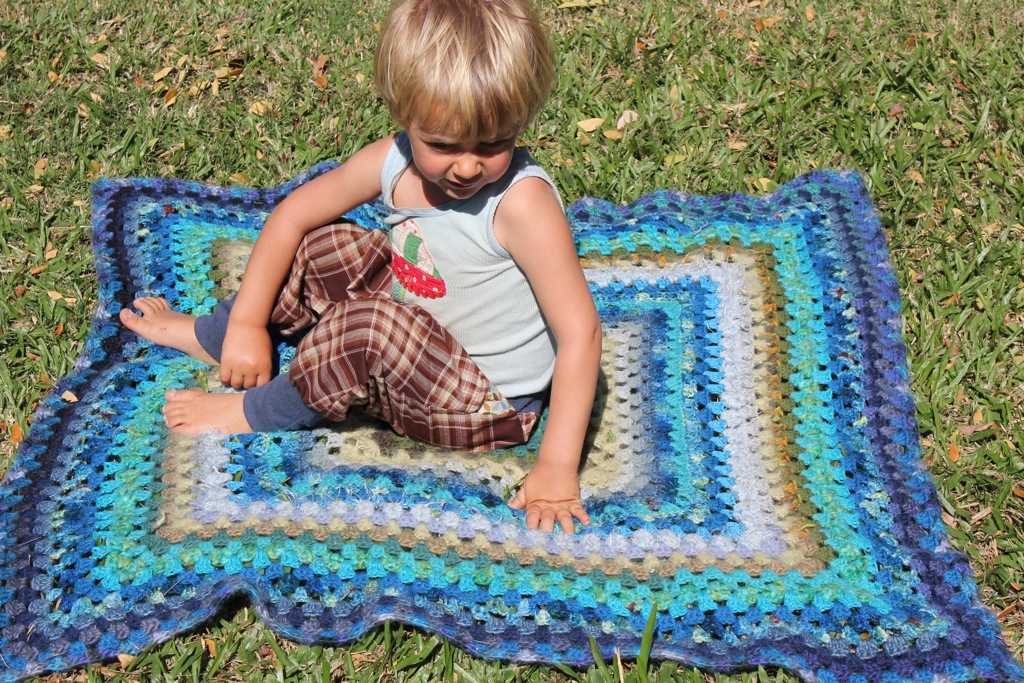
I drew comfort from the idea of a love blanket for this new baby.

I put out a letter to friends old and new, Australian family and distant relatives; to send me yarn in ocean shades and i would craft a blanket for my new babe. Weaving together the threads and thoughts of the beloved people in my life.

From all over Australia and Europe came little parcels, cotton, wool, indigo dyed hemp, silk, mohair, alpaca in all shades and textures. some with tales describing a special ocean moment of the sender for me to enjoy. some with memories of our relationship or good wishes for birth and baby.

IMG_0291

as i crocheted i would hold my thoughts on the sender of the yarn and reflect on our relationship and memories. i knotted the strength of love into this warm wrap for my little one soon coming. {by the way,  i was convinced baby was a little mermaid girl named Iona}

it was a beautiful way to feel connected with my extended network and bring the reality of this baby into my community.

IMG_0292

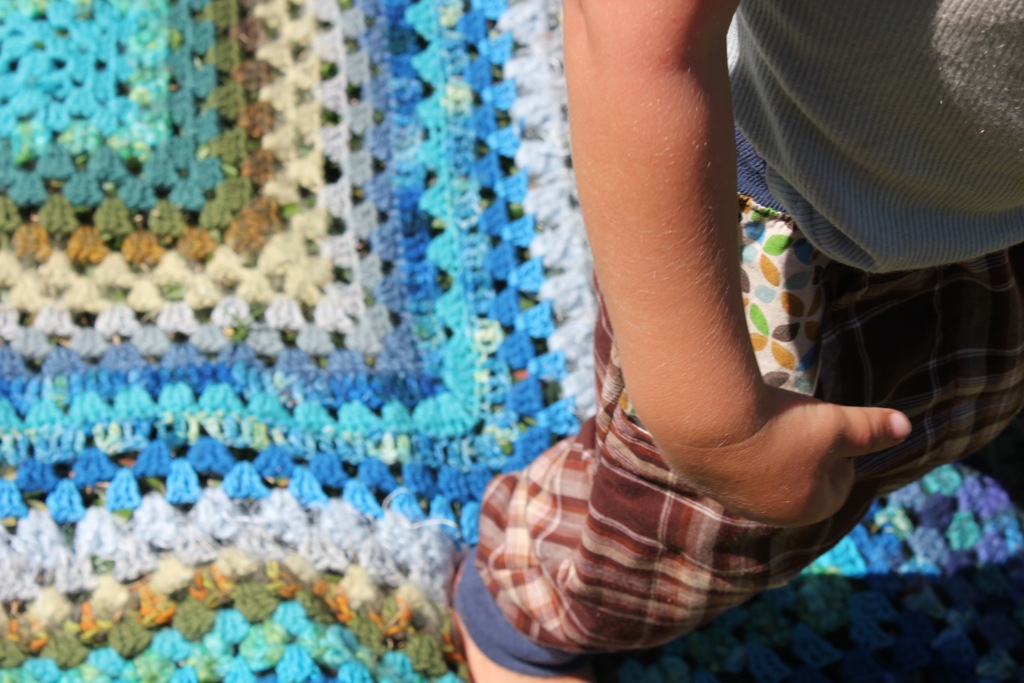
and now i wrap this gentle, nut brown, three years grown boy in these aquamarine, turqoise, royal blue, azure, teal, deep green, gold and tawny shades; i never fail to be reminded of how precious beloved friends and family are. no matter where i am or they are, the richness of our relationships has the warmth of my heart.

thankyou dear ones, i am thinking of you

do you recognise your yarn?

have you made something special for yours or others babies in utero?

xx

Roselinde

ps on a technical note, i began my first ‘proper’ granny square and kept on expanding from there. most yarns an 8 ply with a 6mm hook. as he grows beyond the bounds of this blanket i imagine i will extend it to single bed size as i did with Lily’s.

cedar baby blanket

IMG_0293

Rainbow slippers and a non slip soul

my crafty fingers have been springing forth a multitude of projects in the past weeks

the creative processes soothe me while my inner processes spin me

there has been much sewing (a dear friend has lent me a machine while mine is still in the depths of storage, she needs a cake or something in gratitude…) of trousers, a skirt, a dress, curtains, mending, a witch hat, a witch dress, many cutesy felt toys {more photos and tutorials soon}

just the sunhats on my list did not eventuate…

some knitting of baby bonnets and some crotchet of boy slippers

he chose the yarn, row by row and the pom poms (bom boms)

this means he is more willing to keep his toes warm because he was a part of the creation journey…

clever mama moment!

lily made her own pair, proclaiming about how much faster crotchet is to knitting… IMG_0087

i painted on latex to make a slip free sole

{if only sometimes i could paint my own life with latex to prevent slip ups}

IMG_0133 IMG_0136

the rainbow slipper tutorial

crotchet yourself a rectangle which is as long as the foot and wide enough to meet over the top of the widest part

gather the toes and stitch up the topside about half way

stitch up the back of foot section

you may want a gathering string around the foot entryway particularly for children

make and join on pom poms {essential for good humour}

if you can get a little paint on rubber latex, coat the soles evenly for non-slip and longer life

be warm toes and soul

xx

ps remember to make a second one…

IMG_0102

cedar loving being spooked by a hiding papa

{yes i made his vest and his doll… she had  bath later this day}

{did you enjoy all the bracketing in this post?}

Baby Babushka toy {a tutorial}


A babushka doll made for baby D by Lily

20130505-073546.jpg

An easy soft stuffed toy, easily modified or decorated at your whim.

Lily created this doll one day while we visited friends, it really didn’t take long and she was proud of her efforts.

{i am learning to stay out of the way of her inspirations more and more as her skills develop

and i know she is capable to see it through}

Begin with two large rectangles of felt fabric and a scrap for a face circle

needle and strong thread of various colours

fluffy wool to stuff it

half a cup of rice or similar large grain to fill the bottom of the body

20130505-073521.jpg

sketch a babuska-esque pattern, fold in half and trim the shape to mirror each side

trace this pattern onto your two felt rectangles {front and back of body}20130505-073528.jpg


20130505-073534.jpg


cut out a circular piece in contrasting colour to become the face,

stitch the face circle into position with small neat stitches around the edge

adorn her with features, hair, etc at this point

20130505-073540.jpg

lay front piece on top of the back and begin stitching around the body, Lily began at a shoulder and left the head open to stuff the body

pour the grain into the base of the doll so she will stand up

fill the rest with fluffy wool

stitch up your last opening

adorn as you wish, with embroidery, buttons or fabric clothing etc

20130505-073546.jpggift it to a little person who will surely enjoy chewing on the arms….


Felt Animal Eggy Cosy or Toy {tutorial}

I bought my second ever Frankie magazine to enjoy while having long soaks in this great claw foot bathtub here~!

the first one i bought because the cover image was completely embroidered tiny replicas of everyday items did you see that one?

anyway, somewhere in it’s depths {the mag not the bath} I found an article about Eggy Cosy Critters and was inspired to felt craft with Lily.

She completely was not interested, {oh poor me, I’ll have to do it myself….;)}

until it turned out too small for an egg and I gave it up to be transformed to her liking! I think you will like the end result! I’m wondering which friend she is planning to give it too…
IMG_0208

Here are some guidelines if you’d like to make your own or similar…

We started with 2 rectangles of wool felt fabric 7cm H x 8cm W {bigger if you want to put a real hen egg under it, you could always run another stitch line in closer}

and some scraps for ears. I used craft glue to detail the ears.

make sure you cut the ears with an added 1cm bottom length as it will tuck between the two larger pieces.

embroider on a cutesy whiskery face…

IMG_0225 IMG_0226lay the ears on top of the backing, then place the face on, secure with pins and stitch about 3mm from the edge leaving the bottom open.IMG_0227ahh soooo cute! but too small mumsy… Another possibility at this point is to pop a couple of holding stitches between the fingers and make a finger puppet… or two or three…

so I surrender it over to Lily and she creates….IMG_0228 IMG_0002  with a couple of nifty outfits…

this girl could be a fairy’s dressmaker…IMG_0001have fun with this** i’d love to see a pic if you make one…

ps had a nap, had a massage, had a hug, had some friendly phone calls, feeling better 🙂

thankyou for your support lovely people

a little sewing…

borrowed a vintage cadillac of a sewing machine

{dear stitcher, i have missed you immensely in my life these last 6 months…}

finished the job at hand then

treated myself to a tiny playful sewing make i had seen

on another funky mama

patch together scraps of this and that

make a long snake for the characterless camera strap.

then had fun taking snaps in the mirror for you

go on make one too. it’s fun for you or someone you look at….

i love bringing handmade to the pieces of modern technology in my life

and seeing what others do to theirs…


what do you think?

are you going to make something to brighten up one of your gadgets?

xx

for practical directions

the dimensions of  my patches for my canon strap {4cm wide}

i made a patchwork strip of 10cm by 90cm

folded in half, right sides together and stitched long seam

rolled right side out

and slipped over the strap..

tutorial ~ make a pocket gnome

assemble materials

  • cut yourself a pattern of the square body {6cm}  and cap  {5×2.5cm} has come curvature to it
  • two colors wool felt fabric
  • a wooden bead for the head 12mm or so
  • thread and needle {if child is making it, be kind and use bigger needle and thread/embroidery floss}
  • scissors
  • fluff to stuff {wool or cotton wool}
  • craft glue


cut pattern pieces

1x square for body

1x cap in matching color

1x square for pocket

1x triangle for pocket front


mark centre of doll’s body and firmly attach wooden bead head upright

use a dab of non toxic craft glue to secure the thread in the position of the ear line

stitch seam of the cap {i prefer blanket stitch, but over stitch is equally good and easier for children who are at the beginning of their crafting life}

insert a finger into the cap to open it out in readiness for the head bead

use a dab of glue to secure the cap on gnomes head ensuring you cover the strings

begin at one hand and stitch around the body two thirds of the way to the other hand

stuff your gnomes body with fluff

continue to stitch to other hand and bind off

tie off hands at the wrist with a little string

your gnome is complete,  Yay for you!!

decorate if you wish

to make the pocket lay your triangle piece over the diamond piece and stitch the two outer sides

decorate with fancy stitchin if you wish {stars, flowers, colorful lines, beautiful embroidery etc}

{children can do ‘dolphin stitch’ simple in and out stitch in a line, like a dolphin diving up and down for decoration}

then pop your little gnome into bed!

too cute!

very sweet gifts, children’s activity, stocking fillers and a friend for special times

in a childs {inner children too}  life when they need a comfort in their pocket


a little felting

a mysterious ball of fluffaround a hollowed giant passionfruit of all things!rubbed with dish detergent and water and patient handsmakes a sweet little nest for a little friend
I love being able to help my children live out their creative inspirations and see what is yielded…